Android – Audio Manager
You can easily control your ringer volume and ringer profile i-e:(silent,vibrate,loud e.t.c) in android. Android provides AudioManager class that provides access to these controls.
In order to use AndroidManager class, you have to first create an object of AudioManager class by calling the getSystemService() method. Its syntax is given below.
private AudioManager myAudioManager;
myAudioManager = (AudioManager)getSystemService(Context.AUDIO_SERVICE);
Once you instantiate the object of AudioManager class, you can use setRingerMode method to set the audio or ringer profile of your device. Its syntax is given below.
myAudioManager.setRingerMode(AudioManager.RINGER_MODE_VIBRATE);
The method setRingerMode takes an integer number as a parameter. For each mode , an integer number is assigned that will differentiate between different modes. The possible modes are.
| Sr.No | Mode & Description |
|---|---|
| 1 | RINGER_MODE_VIBRATE This Mode sets the device at vibrate mode. |
| 2 | RINGER_MODE_NORMAL This Mode sets the device at normal(loud) mode. |
| 3 | RINGER_MODE_SILENT This Mode sets the device at silent mode. |
Once you have set the mode , you can call the getRingerMode() method to get the set state of the system. Its syntax is given below.
int mod = myAudioManager.getRingerMode();
Apart from the getRingerMode method, there are other methods available in the AudioManager class to control the volume and other modes. They are listed below.
| Sr.No | Method & description |
|---|---|
| 1 | adjustVolume(int direction, int flags) This method adjusts the volume of the most relevant stream |
| 2 | getMode() This method returns the current audio mode |
| 3 | getStreamMaxVolume(int streamType) This method returns the maximum volume index for a particular stream |
| 4 | getStreamVolume(int streamType) This method returns the current volume index for a particular stream |
| 5 | isMusicActive() This method checks whether any music is active. |
| 6 | startBluetoothSco() This method Start bluetooth SCO audio connection |
| 7 | stopBluetoothSco() This method stop bluetooth SCO audio connection. |
Example
The below example demonstrates the use of AudioManager class. It creates a application that allows you to set different ringer modes for your device.
To experiment with this example , you need to run this on an actual device.
| Steps | Description |
|---|---|
| 1 | You will use Android studio IDE to create an Android application under a package com.example.sairamkrishna.myapplication. |
| 2 | Modify src/MainActivity.java file to add AudioManager code |
| 3 | Modify layout XML file res/layout/activity_main.xml add any GUI component if required. |
| 4 | Modify res/values/string.xml file and add necessary string components. |
| 5 | Modify AndroidManifest.xml to add necessary permissions. |
| 6 | Run the application and choose a running android device and install the application on it and verify the results. |
Here is the content of src/MainActivity.java
package com.example.sairamkrishna.myapplication;

import android.app.Activity;
import android.content.Context;
import android.media.AudioManager;
import android.os.Bundle;
import android.view.View;

import android.widget.Button;
import android.widget.Toast;


public class MainActivity extends Activity {
   Button mode,ring,vibrate,silent;
   private AudioManager myAudioManager;

   @Override
   protected void onCreate(Bundle savedInstanceState) {
      super.onCreate(savedInstanceState);
      setContentView(R.layout.activity_main);

      vibrate=(Button)findViewById(R.id.button3);
      ring=(Button)findViewById(R.id.button2);

      mode=(Button)findViewById(R.id.button);
      silent=(Button)findViewById(R.id.button4);
      myAudioManager = (AudioManager)getSystemService(Context.AUDIO_SERVICE);

      vibrate.setOnClickListener(new View.OnClickListener() {
         @Override
         public void onClick(View v) {
            myAudioManager.setRingerMode(AudioManager.RINGER_MODE_VIBRATE);
            Toast.makeText(MainActivity.this,"Now in Vibrate Mode",
               Toast.LENGTH_LONG).show();
         }
      });

      ring.setOnClickListener(new View.OnClickListener() {
         @Override
         public void onClick(View v) {
            myAudioManager.setRingerMode(AudioManager.RINGER_MODE_NORMAL);
            Toast.makeText(MainActivity.this,"Now in Ringing Mode",
               Toast.LENGTH_LONG).show();
         }
      });

      silent.setOnClickListener(new View.OnClickListener() {
         @Override
         public void onClick(View v) {
            myAudioManager.setRingerMode(AudioManager.RINGER_MODE_SILENT);
            Toast.makeText(MainActivity.this,"Now in silent Mode",
               Toast.LENGTH_LONG).show();
         }
      });

      mode.setOnClickListener(new View.OnClickListener() {
         @Override
         public void onClick(View v) {
            int mod=myAudioManager.getRingerMode();
            if(mod==AudioManager.RINGER_MODE_VIBRATE){
               Toast.makeText(MainActivity.this,"Now in Vibrate Mode",
                  Toast.LENGTH_LONG).show();
            } else if(mod==AudioManager.RINGER_MODE_NORMAL){
               Toast.makeText(MainActivity.this,"Now in Ringing Mode",
                  Toast.LENGTH_LONG).show();
            } else {
               Toast.makeText(MainActivity.this,"Now in Vibrate Mode",
                  Toast.LENGTH_LONG).show();
            }
         }
      });
   }
}
Here is the content of activity_main.xml
Here abc indicates the logo of tutorialspoint
<?xml version="1.0" encoding="utf-8"?>
<RelativeLayout
   xmlns:android="http://schemas.android.com/apk/res/android"
   xmlns:tools="http://schemas.android.com/tools"
   android:layout_width="match_parent"
   android:layout_height="match_parent"
   android:paddingLeft="@dimen/activity_horizontal_margin"
   android:paddingRight="@dimen/activity_horizontal_margin"
   android:paddingTop="@dimen/activity_vertical_margin"
   android:paddingBottom="@dimen/activity_vertical_margin"
   tools:context=".MainActivity">

   <TextView
      android:layout_width="wrap_content"
      android:layout_height="wrap_content"
      android:text="Android Audio Recording"
      android:id="@+id/textView"
      android:textSize="30dp"
      android:layout_alignParentTop="true"
      android:layout_alignParentRight="true"
      android:layout_alignParentEnd="true" />

   <TextView
      android:layout_width="wrap_content"
      android:layout_height="wrap_content"
      android:text="Tutorialspoint"
      android:id="@+id/textView2"
      android:textColor="#ff3eff0f"
      android:textSize="35dp"
      android:layout_below="@+id/textView"
      android:layout_centerHorizontal="true" />

   <ImageView
      android:layout_width="wrap_content"
      android:layout_height="wrap_content"
      android:id="@+id/imageView"
      android:src="@drawable/abc"
      android:layout_below="@+id/textView2"
      android:layout_alignLeft="@+id/textView2"
      android:layout_alignStart="@+id/textView2"
      android:layout_alignRight="@+id/textView2"
      android:layout_alignEnd="@+id/textView2" />

   <Button
      android:layout_width="wrap_content"
      android:layout_height="wrap_content"
      android:text="Mode"
      android:id="@+id/button"
      android:layout_below="@+id/imageView"
      android:layout_alignParentLeft="true"
      android:layout_alignParentStart="true"
      android:layout_marginTop="59dp" />

   <Button
      android:layout_width="wrap_content"
      android:layout_height="wrap_content"
      android:text="Ring"
      android:id="@+id/button2"
      android:layout_alignTop="@+id/button"
      android:layout_centerHorizontal="true" />

   <Button
      android:layout_width="wrap_content"
      android:layout_height="wrap_content"
      android:text="vibrate"
      android:id="@+id/button3"
      android:layout_alignTop="@+id/button2"
      android:layout_alignRight="@+id/textView"
      android:layout_alignEnd="@+id/textView" />

   <Button
      android:layout_width="wrap_content"
      android:layout_height="wrap_content"
      android:text="Silent"
      android:id="@+id/button4"
      android:layout_below="@+id/button2"
      android:layout_alignLeft="@+id/button2"
      android:layout_alignStart="@+id/button2" />
</RelativeLayout>
Here is the content of Strings.xml
<resources>
   <string name="app_name">My Application</string>
</resources>
Here is the content of AndroidManifest.xml
<?xml version="1.0" encoding="utf-8"?>
<manifest xmlns:android="http://schemas.android.com/apk/res/android"
   package="com.example.sairamkrishna.myapplication" >

   <application
      android:allowBackup="true"
      android:icon="@drawable/ic_launcher"
      android:label="@string/app_name"
      android:theme="@style/AppTheme" >

      <activity
         android:name="com.example.sairamkrishna.myapplication"
         android:label="@string/app_name" >

         <intent-filter>
            <action android:name="android.intent.action.MAIN" />
            <category android:name="android.intent.category.LAUNCHER" />
         </intent-filter>

      </activity>

   </application>
</manifest>

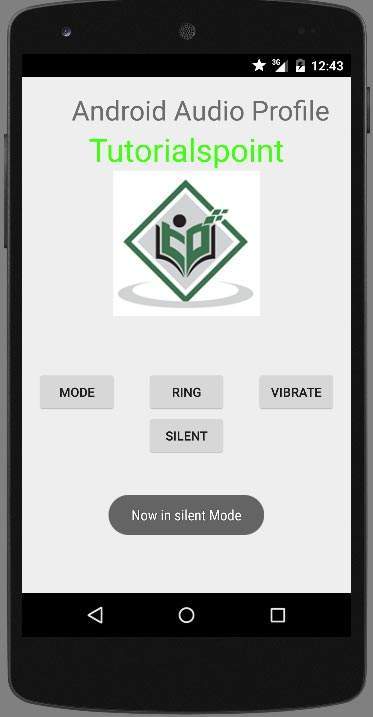
Let’s try to run your application. I assume you have connected your actual Android Mobile device with your computer. To run the app from Android Studio, open one of your project’s activity files and click Run icon from the tool bar. Android studio will display Images
Now select silent button, you would get silent icon at Notification bar
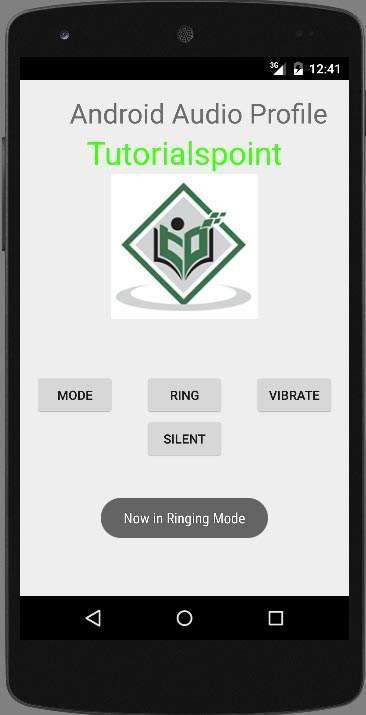
Now just select the ring button and then press the current mode button to see that if its status has been set.
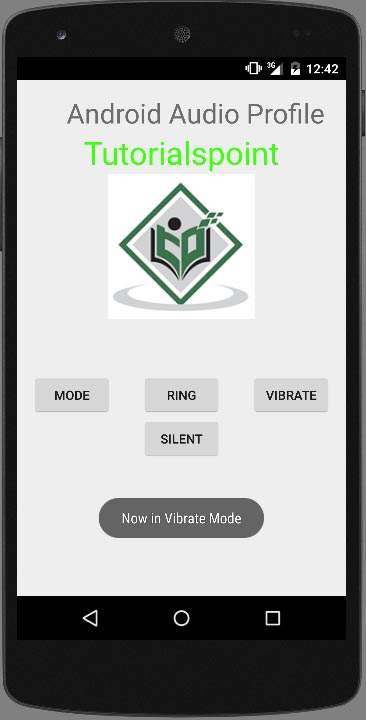
Now press the Vibrate button and then press the current mode button to see that if it is set or not.It will display the following screen.
1,129 total views, 1 views today