Keyboard and Mouse in OpenGL
The interface
Since this code will be re-used throughout the tutorials, we will put the code in a separate file : common/controls.cpp, and declare the functions in common/controls.hpp so that tutorial06.cpp knows about them.
The code of tutorial06.cpp doesn’t change much from the previous tutorial. The major modification is that instead of computing the MVP matrix once, we now have to do it every frame. So let’s move this code inside the main loop :
do{

    // ...

    // Compute the MVP matrix from keyboard and mouse input
    computeMatricesFromInputs();
    glm::mat4 ProjectionMatrix = getProjectionMatrix();
    glm::mat4 ViewMatrix = getViewMatrix();
    glm::mat4 ModelMatrix = glm::mat4(1.0);
    glm::mat4 MVP = ProjectionMatrix * ViewMatrix * ModelMatrix;

    // ...
}
This code needs 3 new functions :
- computeMatricesFromInputs() reads the keyboard and mouse and computes the Projection and View matrices. This is where all the magic happens.
- getProjectionMatrix() just returns the computed Projection matrix.
- getViewMatrix() just returns the computed View matrix.
This is just one way to do it, of course. If you don’t like these functions, go ahead and change them.
Let’s see what’s inside controls.cpp.
The actual code
We’ll need a few variables.
// position
glm::vec3 position = glm::vec3( 0, 0, 5 );
// horizontal angle : toward -Z
float horizontalAngle = 3.14f;
// vertical angle : 0, look at the horizon
float verticalAngle = 0.0f;
// Initial Field of View
float initialFoV = 45.0f;

float speed = 3.0f; // 3 units / second
float mouseSpeed = 0.005f;
FoV is the level of zoom. 80° = very wide angle, huge deformations. 60° – 45° : standard. 20° : big zoom.
We will first recompute position, horizontalAngle, verticalAngle and FoV according to the inputs, and then compute the View and Projection matrices from position, horizontalAngle, verticalAngle and FoV.
Orientation
Reading the mouse position is easy :
// Get mouse position
int xpos, ypos;
glfwGetMousePos(&xpos, &ypos);
but we have to take care to put the cursor back to the center of the screen, or it will soon go outside the window and you won’t be able to move anymore.
// Reset mouse position for next frame
glfwSetMousePos(1024/2, 768/2);
Notice that this code assumes that the window is 1024*768, which of course is not necessarily the case. You can use glfwGetWindowSize if you want, too.
We can now compute our viewing angles :
// Compute new orientation
horizontalAngle += mouseSpeed * deltaTime * float(1024/2 - xpos );
verticalAngle   += mouseSpeed * deltaTime * float( 768/2 - ypos );
Let’s read this from right to left :
- 1024/2 – xpos means : how far is the mouse from the center of the window ? The bigger this value, the more we want to turn.
- float(…) converts it to a floating-point number so that the multiplication goes well.
- mouseSpeed is just there to speed up or slow down the rotations. Fine-tune this at will, or let the user choose it.
- += : If you didn’t move the mouse, 1024/2-xpos will be 0, and horizontalAngle+=0 doesn’t change horizontalAngle. If you had a “=” instead, you would be forced back to your original orientation each frame, which isn’t good.
We can now compute a vector that represents, in World Space, the direction in which we’re looking
// Direction : Spherical coordinates to Cartesian coordinates conversion
glm::vec3 direction(
    cos(verticalAngle) * sin(horizontalAngle),
    sin(verticalAngle),
    cos(verticalAngle) * cos(horizontalAngle)
);
This is a standard computation, but if you don’t know about cosine and sinus, here’s a short explanation :

The formula above is just the generalisation to 3D.
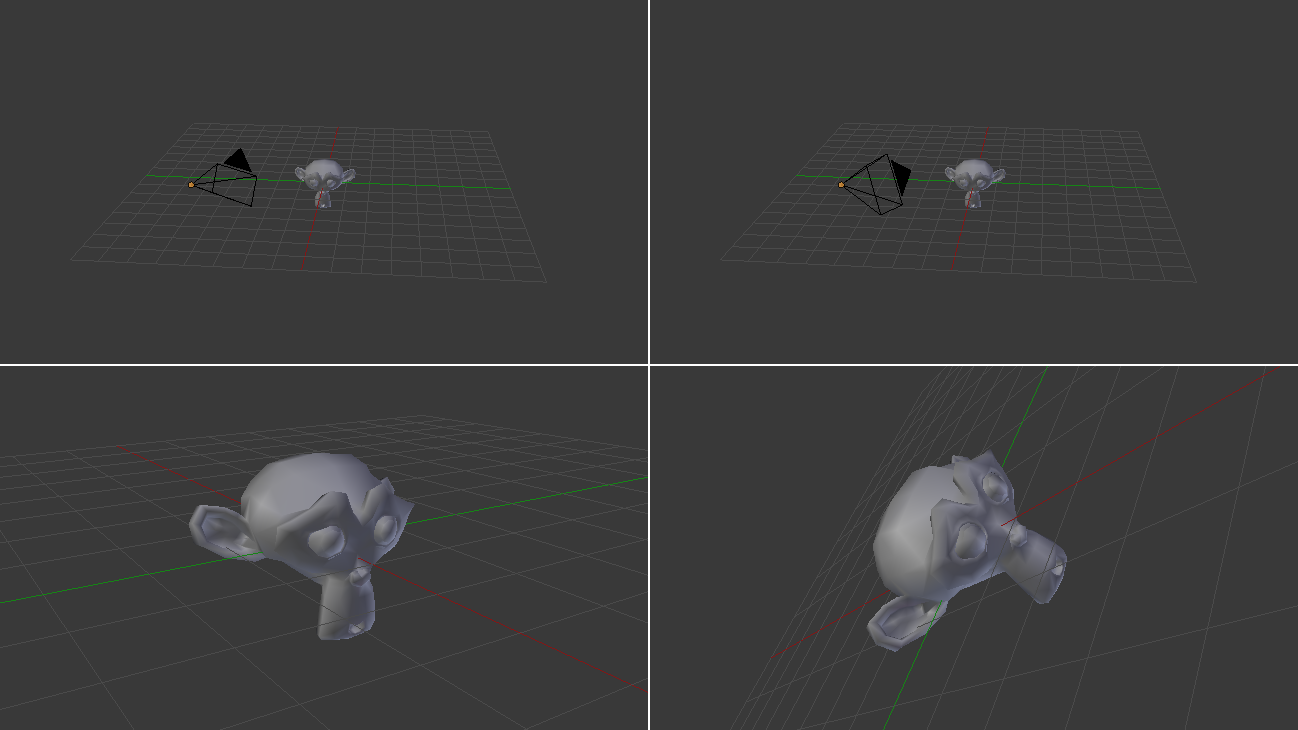
Now we want to compute the “up” vector reliably. Notice that “up” isn’t always towards +Y : if you look down, for instance, the “up” vector will be in fact horizontal. Here is an example of to cameras with the same position, the same target, but a different up:
In our case, the only constant is that the vector goes to the right of the camera is always horizontal. You can check this by putting your arm horizontal, and looking up, down, in any direction. So let’s define the “right” vector : its Y coordinate is 0 since it’s horizontal, and its X and Z coordinates are just like in the figure above, but with the angles rotated by 90°, or Pi/2 radians.
// Right vector
glm::vec3 right = glm::vec3(
    sin(horizontalAngle - 3.14f/2.0f),
    0,
    cos(horizontalAngle - 3.14f/2.0f)
);
We have a “right” vector and a “direction”, or “front” vector. The “up” vector is a vector that is perpendicular to these two. A useful mathematical tool makes this very easy : the cross product.
// Up vector : perpendicular to both direction and right
glm::vec3 up = glm::cross( right, direction );
To remember what the cross product does, it’s very simple. Just recall the Right Hand Rule from Tutorial 3. The first vector is the thumb; the second is the index; and the result is the middle finger. It’s very handy.
Position
The code is pretty straightforward. By the way, I used the up/down/right/left keys instead of the awsd because on my azerty keyboard, awsd is actually zqsd. And it’s also different with qwerZ keyboards, let alone korean keyboards. I don’t even know what layout korean people have, but I guess it’s also different.
// Move forward
if (glfwGetKey( GLFW_KEY_UP ) == GLFW_PRESS){
    position += direction * deltaTime * speed;
}
// Move backward
if (glfwGetKey( GLFW_KEY_DOWN ) == GLFW_PRESS){
    position -= direction * deltaTime * speed;
}
// Strafe right
if (glfwGetKey( GLFW_KEY_RIGHT ) == GLFW_PRESS){
    position += right * deltaTime * speed;
}
// Strafe left
if (glfwGetKey( GLFW_KEY_LEFT ) == GLFW_PRESS){
    position -= right * deltaTime * speed;
}
The only special thing here is the deltaTime. You don’t want to move from 1 unit each frame for a simple reason :
- If you have a fast computer, and you run at 60 fps, you’d move of 60*speed units in 1 second
- If you have a slow computer, and you run at 20 fps, you’d move of 20*speed units in 1 second
Since having a better computer is not an excuse for going faster, you have to scale the distance by the “time since the last frame”, or “deltaTime”.
- If you have a fast computer, and you run at 60 fps, you’d move of 1/60 * speed units in 1 frame, so 1*speed in 1 second.
- If you have a slow computer, and you run at 20 fps, you’d move of 1/20 * speed units in 1 second, so 1*speed in 1 second.
which is much better. deltaTime is very simple to compute :
double currentTime = glfwGetTime();
float deltaTime = float(currentTime - lastTime);
Field Of View
For fun, we can also bind the wheel of the mouse to the Field Of View, so that we can have a cheap zoom :
float FoV = initialFoV - 5 * glfwGetMouseWheel();
Computing the matrices
Computing the matrices is now straightforward. We use the exact same functions than before, but with our new parameters.
// Projection matrix : 45° Field of View, 4:3 ratio, display range : 0.1 unit <-> 100 units
ProjectionMatrix = glm::perspective(glm::radians(FoV), 4.0f / 3.0f, 0.1f, 100.0f);
// Camera matrix
ViewMatrix = glm::lookAt(
position, // Camera is here
position+direction, // and looks here : at the same position, plus "direction"
up // Head is up (set to 0,-1,0 to look upside-down)
);
Results
Backface Culling
Now that you can freely move around, you’ll notice that if you go inside the cube, polygons are still displayed. This can seem obvious, but this remark actually opens an opportunity for optimisation. As a matter of fact, in a usual application, you are never inside a cube.
The idea is to let the GPU check if the camera is behind, or in front of, the triangle. If it’s in front, display the triangle; if it’s behind, and the mesh is closed, and we’re not inside the mesh, then there will be another triangle in front of it, and nobody will notice anything, except that everything will be faster : 2 times less triangles on average !
The best thing is that it’s very easy to check this. The GPU computes the normal of the triangle (using the cross product, remember ?) and checks whether this normal is oriented towards the camera or not.
This comes at a cost, unfortunately : the orientation of the triangle is implicit. This means that is you invert two vertices in your buffer, you’ll probably end up with a hole. But it’s generally worth the little additional work. Often, you just have to click “invert normals” in your 3D modeler (which will, in fact, invert vertices, and thus normals) and everything is just fine.
Enabling backface culling is a breeze :
// Cull triangles which normal is not towards the camera
glEnable(GL_CULL_FACE);
9,313 total views, 1 views today