C# and Code Organization
|
A namespace is a section of code that is identified with a specific name. The name could be anything such as somebody’s name, the name of the company’s department, or a city. To create a namespace, you start with the namespace keyword followed by the name of the section. Like a class, the section that is part of a namespace starts with an opening curly bracket “{” and ends with a closing curly bracket “}”. Here is an example: |
namespace Business
{
}
Between the curly brackets, you can type anything that is part of the namespace. For example, you can create a class inside of a namespace. Here is an example: namespace Business
{
class House
{
}
}
|
After creating the necessary members of a namespace, you can use the period operator to access an item that is part of the namespace. To do this, in the desired location, type the name of the namespace, followed by a period, followed by the desired member of the namespace. Here is an example: using System;
namespace Business
{
public class House
{
public string PropertyNumber;
public decimal Price;
}
}
public class Exercise
{
static void Main()
{
Business.House property = new Business.House();
property.PropertyNumber = "D294FF";
property.Price = 425880;
Console.WriteLine("=//= Altair Realty =//=");
Console.WriteLine("Properties Inventory");
Console.Write("Property #: ");
Console.WriteLine(property.PropertyNumber);
Console.Write("Market Value: ");
Console.WriteLine(property.Price);
Console.WriteLine();
}
}
This would produce: =//= Altair Realty =//= Properties Inventory Property #: D294FF Market Value: 425880 Press any key to continue . . . You can create one namespace inside of another namespace. Creating a namespace inside of another is referred to as nesting the namespace. The namespace inside of another namespace is nested. To create a namespace inside of another, simply type it as you would create another namespace. Here is an example: namespace Business
{
public class House
{
public string PropertyNumber;
public decimal Price;
}
namespace Dealer
{
}
}
In the example above, the Dealer namespace is nested inside of the Business namespace. After creating the desired namespaces, nested or not, you can create the necessary class(es) inside of the desired namespace. To access anything that is included in a nested namespace, you use the period operator before calling a member of a namespace or before calling the next nested namespace. Here is an example: using System;
namespace Business
{
public class House
{
public string PropertyNumber;
public decimal Price;
}
namespace Dealer
{
public class Car
{
public decimal Price;
}
}
}
public class Exercise
{
static void Main()
{
Business.House property = new Business.House();
property.PropertyNumber = "D294FF";
property.Price = 425880;
Console.WriteLine("=//= Altair Realty =//=");
Console.WriteLine("Properties Inventory");
Console.Write("Property #: ");
Console.WriteLine(property.PropertyNumber);
Console.Write("Market Value: ");
Console.WriteLine(property.Price);
Console.WriteLine();
Business.Dealer.Car vehicle = new Business.Dealer.Car();
vehicle.Price = 38425.50M;
Console.Write("Car Value: ");
Console.WriteLine(vehicle.Price);
}
}
This would produce: =//= Altair Realty =//= Properties Inventory Property #: D294FF Market Value: 425880 Car Value: 38425.50 Press any key to continue . . . In the same way, you can nest as many namespaces inside of other namespaces as you judge necessary.
To make programming in C# a little easier, many classes ship with it and they are created in various namespaces of the .NET Framework. Each namespace in C# is used to provide a specific set of classes. The most regularly used namespace in the C# language is called System. Inside of the System namespace is a class called Console. The Console class is used to display things on the console screen also called the DOS window. The Console class contains static methods to display information on the screen or to retrieve information from the user who types it in the DOS window. The method that is used to display text on the screen is called Write. To use the Write() method, inside of the parentheses, type the sentence between double-quotes. Here is an example: public class Exercise
{
static void Main()
{
System.Console.Write("The Wonderful World of C# Programming");
}
}
Besides the Write() method, the Console class also provides another static method named WriteLine(). The difference is that, after displaying something on the screen, the Write() method keeps the caret on the same line but WriteLine() transfers the caret to the next line. We will see various examples of this behavior throughout our lessons. We saw that, to call an object or a method that is part of a namespace, you must “qualify” that method or object using the period operator. Instead of using this approach, if you already know the name of a namespace that exists or has been created in another file, you can use a special keyword to indicate that you are using a namespace that is defined somewhere. This is done with the using keyword. To do this, on top of the file (preferably), type using followed by the name of the namespace. With the using keyword, you can include as many external namespaces as necessary.
In C# (unlike many other languages such as C/C++, Pascal, etc), all of the data types we have used so far are in fact complete classes. This means that they are equipped with methods. These classes are defined in the System namespace. The classes of these data types are defined as:
This means that, if you don’t want to use the data types we have reviewed so far, you can use the class that is defined in the System namespace. To use one of these types, type the System namespace followed by a period. Then type the equivalent class you want to use. Here is an example: class Operations
{
public double Addition()
{
System.Double a;
System.Double b;
System.Double c;
a = 128.76;
b = 5044.52;
c = a + b;
return c;
}
}
Because the regular names of data types we introduced in the previous lessons are more known and familiar, we will mostly use them. Because the data types are defined as classes, they are equipped with methods. One of the methods that each one of them has is called ToString. As its name implies, it is used to convert a value to a string. |
In Lesson 1, we saw that, to see the result of an application, you must execute it. To make this possible,, Microsoft Visual C# ships with an internal program called a compiler. A compiler is a computer program made of internal other sub-programs. One of the sub-programs, in fact probably the first, of a compiler is called a parser. A parser “scans” a file that contains (part of) the program. It checks for syntax, keywords, unknown words, and some other routines. If the parser finds a problem, which could be anything, either it stops or it continues making a list of the mistakes it found. Then it displays this list to you to fix. Sometimes it would point to the exact line where the/a problem was found. Sometimes it would point to the line where the problem showed its impact although the problem may be found somewhere else. With experience, you will know how to fix the programs or troubleshoot these problems. In this ebook, we will address as many issues as possible. If the parser doesn’t find any problem, or after you have fixed the problems, it (the parser) passes its result(s) to the compiler. The compiler calls another program called a linker. If the program contains just one file, the linker considers it. If the program contains more than one file, the linker considers them. The linker gathers some of the files that the C# compiler shipped with (those files that your program needs in order to work, since your program doesn’t need all possible files that C# ships with), puts them together (“links” them) with your file(s) to get your instructions in a manner that can produce a suitable result. If there is no significant problem, the compiler creates the program. This doesn’t mean that everything is alright, it only means that the compiler thinks that everything is alright: it is still possible that the result may not be what you would expect. To make your life easier, all of the sub-programs (parser, linker, debugger, etc) that ship with C# are grouped in one large program: the compiler. Therefore, from now on, we will use the word “compiler” to refer to the program you use to “translate” your English-based instructions into a computer-based language. The compiler that ships with the C# version we will use, that is, the compiler of the Microsoft .NET Framework is a program called csc. Like most other programs, it has the extension .exe. This csc name is not standard. This means that another C# compiler may have another name; csc.exe is just the name of the compiler we will use. The csc compiler is freely available if you download the .NET Framework from the Microsoft web site. In this book, we will create our program using Microsoft Visual C# but if you didn’t have it, you would still be able to create and execute applications. To do this, at the Command Prompt, you would type csc, followed by the name of the file that contains the code with its extension. An example would be: csc Filename.cs When you do this, an executable with the same name as the file is created. If you want, you can ask the compiler to produce an executable using the name of your choice. To do this, you would compile the project using the following formula: csc /out:NameOfExecutate.exe Filename.cs The NameOfExecutate factor in our formula represents the name you want the executable to have. If the name you want is in one word, you can just type it. If you want a name made of various words, you can include those words in double-quotes The FileName factor is one we are familiar with. When C# was invented, one of its biggest goals was to avoid some of the difficulties of C/C++. Among them was the use of pointers. C/C++ uses pointers to refer to the area in memory where a value is located. C# highly avoids pointers and takes over memory management as opposed to letting the programmer take care of that aspect of an application. You can still use pointers in C# in extreme cases when you judge them necessary. Because the C# compiler is in charge of managing the memory used by the values of an application, pointers are said to be unsafe. If you want to use a pointer in your application, you must precede the name of every method that uses unsafe code with the unsafe keyword. Here is an example: using System;
class Exercise
{
unsafe static void Main()
{
int Length = 224;
int *Len = &Length;
Console.Write("Length ");
Console.WriteLine(Length);
Console.Write("Length ");
Console.WriteLine(*Len);
Console.WriteLine();
Length = 804;
Console.Write("Length ");
Console.WriteLine(Length);
Console.Write("Length ");
Console.WriteLine(*Len);
}
}
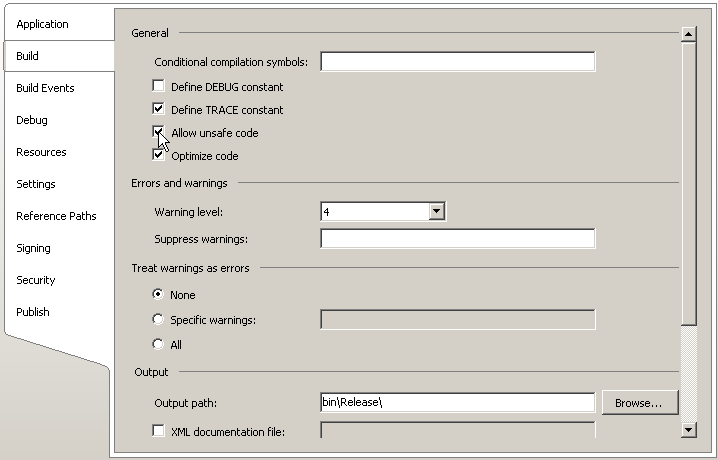
To compile the application, you must indicate that you are using unsafe code. To do that, use the /unsafe modifier. Here is an example: csc /unsafe Exercise.cs To apply this option in Microsoft Visual C#, on the main menu, you can click Project -> Project Properties… In the Build section, click the Allow Unsafe Code check box:
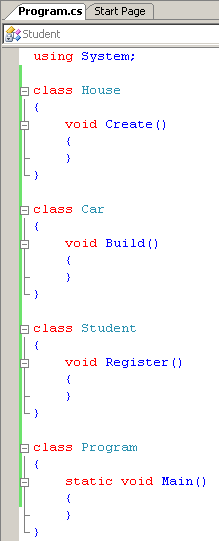
Microsoft Visual C# provides various techniques to assist you with code writing and management. The characteristics include color-coded words, intuitive indentation, delimitation of sections of code, etc. Consider the following contents of the Code Editor based on what we have reviewed so far:
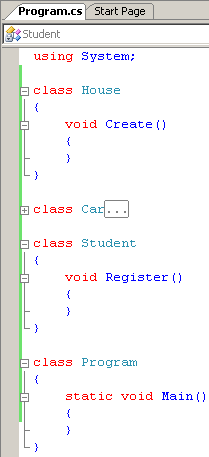
Notice that there are – buttons on the left side of some lines of code. These allow you to collapse a section of code if you think you don’t need to see it. To do this, you can click the – button. If you click that – button, it changes into a + button. Here is an example:
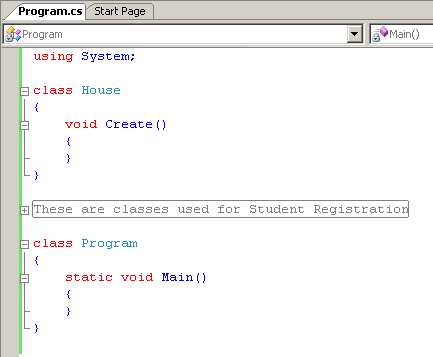
The + button allows you to expand a hidden code section. This behavior of creating + and – buttons is part of the Code Editor of Microsoft Visual Studio (yes, many other programming environments use that behavior also). To create these sections, the Code Editor follows some rules. For example, it looks for the start and end of such items as directives, namespaces, classes, methods, etc. Besides, or instead of, the sections of code created by the Code Editor, if you want, you can create your own sections. To do this, start the section with #region Whatever and end it with #endregion Whatever When and where you start, the #region expression is required. On the right side of this expression, you can type anything you want on the line. To end the section, type #endregion, followed by anything you want. Consider the following example: using System;
class House
{
void Create()
{
}
}
#region These are classes used for Student Registration
class Car
{
void Build()
{
}
}
class Student
{
void Register()
{
}
}
#endregion We can just stop it here
class Program
{
static void Main()
{
}
}
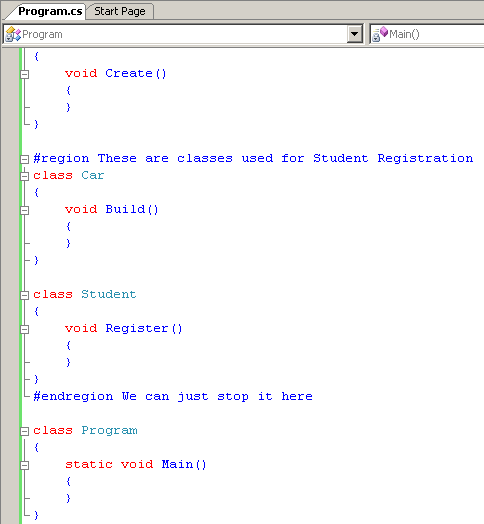
You don’t have to type anything on the right side of #endregion. After creating the region, the Code Editor would display a – button to the left side of #region with a line from there to the left of #endregion:
This then allows you to expand and collapse that section at will:
We mentioned that you didn’t have to type anything on the right side of #endregion and you could leave it empty. In our example, notice that there is a rectangle with gray lines around the string that follows #region. This rectangle doesn’t cover the string that follows #endregion. This means that if you don’t type anything on the right side of #endregion, that section on the right side the #region line would not show. |
10,572 total views, 1 views today
